" Welcome my visitors...!!! | Get Here for Eset Smart Security and Eset NOD32 V2 & V3 Updates For Manually / Offline Method | Download Eset Smart Security and Eset NOD32 V2 for trial drive & V3 for Trial drive | Download OO Defrag Full Version | Download TuneUp Utilities 2008 Full Version | Download WinASO Registry Optimizer Full Version | Please came again, thank you... "
Google

Wednesday, January 30, 2008

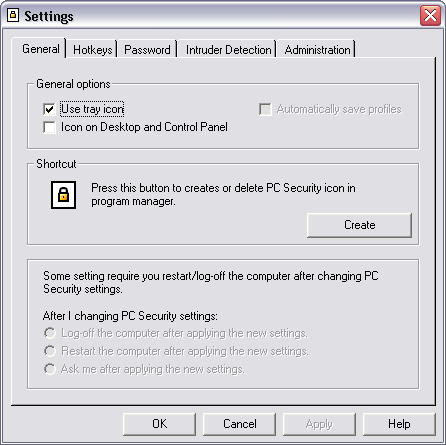
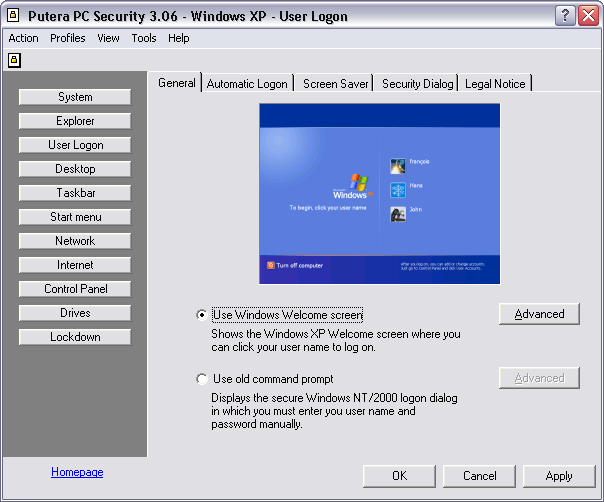
Putera PC Security 3.07

As'kum wtb... nie dier... satu lagi software... bergune ntuk para2 Admin... jugak bg yg ader byk akaun espc windows XP...

Nak Lock komputer?
Adik suke delete file sistem?
Abang suke nengok mende bukan-bukan?
Kakak suke chatting?
Mak suke itu?
Abah suke ini?


Marilah mencuba software buatan tempatan. Dan semestinya percuma. No Nag Screen. No Trial. No Need To [biskut tawar].

Fungsi:
1) Mengunci sistem, explorer, network, software, application dan sebagainya.
2) Juga boleh memantau sistem secara real-time monitoring (Untuk yang berdaftar sahaja).

Kegunaan:
1) Amat sesuai digunakan di-rumah, di-pejabat, di kafe siber atau dimana-mana sahaja.

Sistem Keperluan:
1) Windows 98, ME, XP, 2000.


user posted image

Setting...

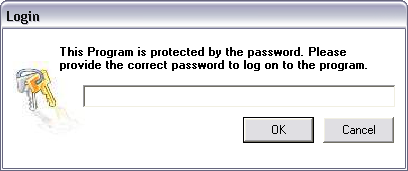
user posted image

Locking function...

ZEteX Threat Remover.

Salam smue... blog dah ok... posting lagi... hati cukup gembira... here... satu software ala2 antivirus ciptaan anak tempatan... baru usia 18 tahun dah nak masuk 19 tahun esok lusa katenyer... try yer... ok jugak nie... sesuai ntuk wat backup AV... satu lagi... software nie PORTABLE...


ZEteX Thread Remover v2.1
Compiled at 15:01:08 October 28 2007
Copyright © 2001-2007 by ZEteX Group
All Rights Reserved

Usage:
+ ZEteX Thread Remover helps you to remove computer threats such
as Virus, Worm, Trojan, Spyware, Adware and its variants from your
computer.

Limitation:
+ It is highly recommended to disable or turn off any installed
antivirus before running this software. Otherwise, it can’t detect the
threats successfully.

Disclaimer:
+ We are not responsible for any lost of data or damage made by this
software.
+ Any bugs or problems should be report for fixing and future
improvement.

System Requirement:
+ Intel/AMD/Others with 500 MHz or above
+ 128 MB of RAM
+ 3 MB free Hard Disk space
+ Any Keyboard & Mouse device

Donation:
+ If you found this software are very useful, you could make
DONATION to us for improves software performance and services.

This software is a freeware. Feel free to use and distribute.

For more information and supports, comment or bugs, email us at:
zetex_mail@yahoo.com


:: Proudly Made In Malaysia ::

Sunday, January 27, 2008

Manual | Manually | Offline >>> Update ESET Smart Security & NOD32 V2 & V3 AntiVirus System.


Everyone is now convinced that Eset NOD32 is the best anti-virus for Windows right now & got many awards. Want more information about Eset NOD32 antivirus system? Just visit this site www.eset.com and www.computersecurityassociates.com.

Order now for original NOD32 in Malaysia only, please contact me to get it at fareast@live.com.

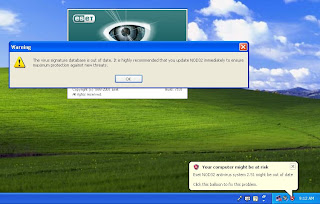
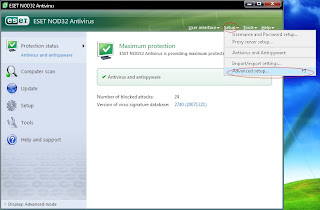
You can't simply download virus definition update files from the web and update your NOD32 locally on a PC with no internet connection. At least, it's not that easy. Simply follow these instructions to have an offline update method for your copy of NOD32 version 2.7.

>> NOD32 V2 <<
Update off a USB drive or a folder on your hard drive, try the following.
  1. Download here NOD32 Updates V2 (V3012; 20080409).
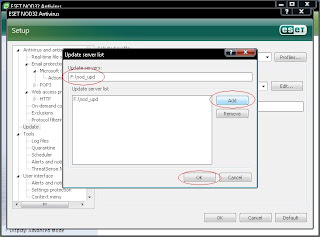
  2. Extract to the root of your hard drive or USB drive, or any other folder that you're comfortable with. Make note of the folder with name nod_upd in your USB drive or hard drive, for example C:\nod_upd.
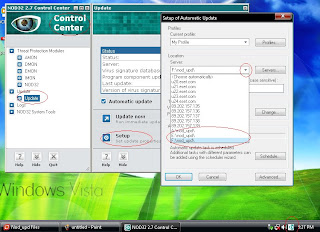
  3. Open up the NOD32 Control Center by clicking on the system tray icon.
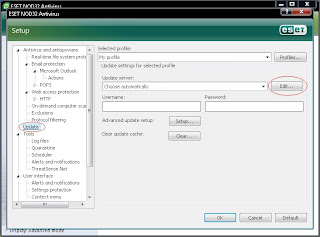
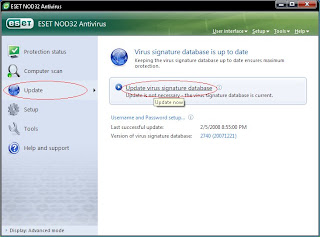
  4. Open the "Update" screen and click on "Setup".
  5. Choose your USB drive, eg. F:\nod_up\ or D:\nod_upd or anything...
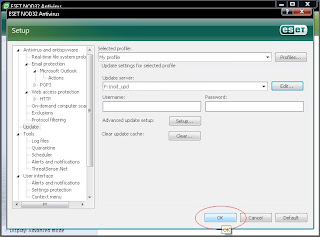
  6. Then, at the update screen, click "Update now".

After finish, your NOD32 should be updated!


Update 29/1/2008 : Updates (V2831; 20080129) >> Click Here...
Update 13/2/2008 : Updates (V2872; 20080213) >> Click Here...
Update 17/2/2008 : Updates (V2881; 20080217) >> Click Here...
Update 18/2/2008 : Updates (V2882; 20080218) >> Click Here...
Update 19/2/2008 : Updates (V2885; 20080219) >> Click Here...
Update 19/2/2008 : Updates (V2888; 20080220) >> Click Here...
Update 24/2/2008 : Updates (V2898; 20080223) >> Click Here...
Update 04/03/2008 : Updates (V2915; 20080303) >> Click Here...
Update 07/03/2008 : Updates (V2928; 20080306) >> Click Here...
Update 18/03/2008 : Updates (V2954; 20080318) >> Click Here...
Update 19/03/2008 : Updates (V2887; 20080319) >> Click Here...
Update 24/03/2008 : Updates (V2968; 20080324) >> Click Here...
Update 1/04/2008 : Updates (V2990; 20080401) >> Click Here...
Update 2/04/2008 : Updates (V2991; 20080402) >> Click Here...
Update 3/04/2008 : Updates (V2996; 20080403) >> Click Here...
Update 4/04/2008 : Updates (V2998; 20080404) >> Click Here...
Update 4/04/2008 : Updates (V3006; 20080407) >> Click Here...
Update 9/04/2008 : Updates are up (V3012; 20080409) >> Click Here...


>> NOD32 V3 <<
  1. Download here NOD32 Updates V3 (v3012; 20080409).
  2. Same method like V2...
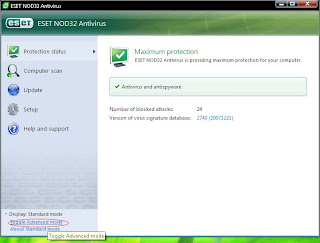
  3. Look at the picture above & do it by yourself...


Sorry for my poor English! I'm still study :)

Good luck! :)

Update 24/2/2008 : Updates (V2898; 20080223) >> Click Here...
Update 26/2/2008 : Updates (V2901; 20080225) >> Click Here...
Update 28/2/2008 : Updates (V2903; 20080226) >> Click Here...
Update 28/2/2008 : Updates (V2907; 20080228) >> Click Here...
Update 03/03/2008 : Updates (V2915; 20080303) >> Click Here...
Update 06/03/2008 : Updates (V2921; 20080304) >> Click Here...
Update 07/03/2008 : Updates (V2923; 20080305) >> Click Here...
Update 17/03/2008 : Updates (V2949; 20080315) >> Click Here...
Update 18/03/2008 : Updates (V2954; 20080318) >> Click Here...
Update 19/03/2008 : Updates (V2887; 20080319) >> Click Here...
Update 24/03/2008 : Updates (V2968; 20080324) >> Click Here...
Update 1/04/2008 : Updates (V2990; 20080401) >> Click Here...
Update 2/04/2008 : Updates (V2991; 20080402) >> Click Here...
Update 3/04/2008 : Updates (V2996; 20080403) >> Click Here...
Update 4/04/2008 : Updates (V2998; 20080404) >> Click Here...
Update 4/04/2008 : Updates (V3006; 20080407) >> Click Here...
Update 9/04/2008 : Updates are up (V3012; 20080409) >> Click Here...


Sunday, January 20, 2008

Hilangkan Tanda Anak Panah Icon Di Desktop.


Pernahkah anda perhatikan ikon-ikon di desktop anda penuh dengan tanda anak panah. Maybe nampak seperti tidak cantik pada desktop anda. Lihat dibawah cara-cara untuk menghilangkan arrow shortcut tersebut.

Berikut adalah cara untuk menghilangkan anak panah shortcut pada desktop anda:

1. Klik Start -> Run...
2. Taip "regedit" dalam kotak Open.
3. Buka folder satu persatu mengikut aturan berikut :

My Computer\ HKEY_CLASSES_ROOT \ lnkfile ( lnkfile = LNKFILE)

4. Pada bahagian kanan anda akan nampak registry IsShortcut.
5. Klik kanan pada IsShortcut, dan pilih Delete. (Jangan risau, sistem pc anda tidak akan rosak.)
6. Keluar dari regedit dan restart komputer anda untuk keberkesanan sepenuhnya.
7. Lihat tanda anak panah ikon shortcut anda telah hilang. :-p

Banyak lagi tip-tip akan menanti anda. Jumpa lagi..

Owner link >>www.mywindowsxp.info<<

Tukar Nama @ Syarikat Pada System Properties.

Anda boleh menukar nama anda dan syarikat pada System Properties seperti yang saya lakukan pada imej di atas dengan cara yang mudah. Lihat nama saya : Mohd. Faizul B. Zainal dan Organisasi : Al-Fai'zun Wal Muttaqin yang saya ubah. Cuma pakai Registry Editor sahaja.

Langkahnya seperti berikut :

  1. Klik Start -> Run..
  2. Taip regedit dan klik open.
  3. Cari registry seperti alamat berikut :

  1. Kemudian cari RegisteredOrganization, klik kanan -> Modify-> masukkan apa-apa nama untuk syarikat anda -> Ok.
  2. Kemudian cari RegisteredOwner, klik kanan -> Modify -> Masukkan nama anda -> Ok.
  3. Siap.

Cuba lihat hasilnya di System Properties anda :

Start -> Control Panel -> System ATAU

My Computer -> klik kanan Properties.

Wednesday, January 2, 2008

Tips Komputer & Internet.

TIP #1 - Meringankan Surfing Semasa Download.
Tips-Meringankan surfing semasa guna BitComet. - set priority.

Tekan kekunci CTRL+ALT+DEL

Windows Task Manager
Klik Process.

Cari iexplorer.exe (kalau guna IE)
klik kanan > Priority > High

Cari BitComet.exe
klik kanan > Priority > BelowNormal

Surfing akan terasa laju dan download macam biasa.

***************

TIP #2 - Mempercepatkan Boot Dan Buka Program Tertentu.
Windows XP Pro-Edit Registry.

Klik Start > Run > Regedit (enter)

HKEY_LOCAL_MACHINE\SYSTEM\ControlSet001\Control\Session Manager\Memory Management\PrefetchParameters

Klik 2 kali EnablePrefetcher

Value Data = 2 > OK

Tutup Registry dan restart komputer

Mempercepatkan Buka Program.

Klik kanan ikon shortcut di desktop (contoh Nero) > Properties.

Target:
"D:\Program Files\Ahead\Nero StartSmart\NeroStartSmart.exe" /Prefetch:1

Tambah /Prefetch:1 dihujung path.
Klik OK.


***************

TIP #3 - Membersihkan CD Yang Tak Dapat Dibaca CDROM/DVD.

Guna ubat gigi.

CD kesayangan anda tiba2 tak dapat dibaca CDROM/DVD Drive walaupun telah dicuba pada komputer lain. Jangan risau, masih ada peluang. Gunakan ubat gigi.

1. Letakkan sedikit ubat gigi (sebesar hujung jari) ke atas permukaan berkilat (bukan permukaan berlabel)
2. Gosokkan dengan menggunakan jari sehingga rata seluruh permukaan beberapa kali (dalam 30 saat gitu)
3. Kemudian cuci permukaan tersebut dengan menggunakan cecair pencuci pinggan.
4. Basuh CD sehingga bersih dengan air biasa (air paip)
5. Lap seluruh CD dengan kain yang lembut dan bersih.
6. Biarkan seketika supaya CD betul2 kering.
7. Cuba try test... bingo!!! biggrin.gif

Info: Cara nie memang berkesan kalaupun tidak 100% ... cuba lah biggrin.gif

Panduan Penyelenggaraan Komputer OS WinXP.


Download:
Saiz Fail 250 MB
Link 1-90MB
Link 2-90MB
Link 3-75MB

Gabungkan ketiga-tiga fail dengan program 7-Zip
Password : p45sW0rd

CARA GABUNG:
Ada 3 fail yang telah dipecahkan menggunakan 7-zip

1. Kena download dan install program 7-zip
2. Kemudian klik kanan fail yang pertama atau salah satu 3 fail tersebut.
3. Pilih Extract File (jangan lupa password)

4. 7-zip akan mencantumkan semula ketiga2 fail menjadi 1 fail zip (7z)
5. Klik kanan fail 1 fail zip > Extract File
6. Selesai dan boleh digunakan.

Tips Penyelenggaraan Komputer.

Sistem Operasi : Windows XP Pro SP2

Panduan ini ditujukan kepada mereka yang ingin membuat penyelenggaraan komputer sendiri
atau komputer kawan-kawan yang mengalami masalah lambat loading, program slow dsb.

Semoga dengan panduan ini dapat mengurangkan skit sebanyak masalah penggunaan komputer. Mari kita kongsi idea bersama.

SENARIO 1

Ada satu PC bila start nak masuk Desktop terlalu slow, tidak seperti biasa yang mengambil masa antara 20 - 30 saat sahaja. Windows masih berfungsi tetapi nak bukak satu-satu program mengambil masa agak lama. Windows lambat respon.

PENYELESAIAN

Disable System StartUp
1. Start PC seperti biasa
2. Dalam Windows Desktop, klik Start > Run
3. Taip MSCONFIG


4. Disable All > Apply
5. Restart komputer.

Bersihkan Hard Disk
1. Klik Start > Programs > Accessories > System Tools > Disk CleanUp


2. Tick mana2 item yang anda hendak bersihkan dari hard disk

Dengan cara ini ruang kosong hard disk akan bertambah.

Bersihkan Internet Temporary Files
Jika Guna Internet Explorer; IE
1. Buka IE
2. Klik Tools > Internet Options


Fix Registry
Boleh guna program seperti TuneUP Utility yang boleh di download dari internet.

http://www.download.com/3000-2094_4-10698444.html
http://www.tune-up.com/

Guna 1Click Maintenance

Defrag Hard Disk
Program yang disyorkan O&O Defrag 8.0

http://www.oo-software.com/smb/en/download/

Cara Guna.

1. Buka program O&O Defrag
2. Pilih kaedah Stealth


3. Setelah selesai, restart PC dan buka semula program O&O Defrag
4. Pilih kaedah Complete/Access


Peringatan:
Jika sekiranya semasa anda melakukan penyelenggaraan, terdapat Virus dan seumpamnya,
bersihkan dulu.


BACKUP SISTEM WINDOWS - SYSTEM RESTORE


1. Klik Start > Programs > Accessories > System Tools > System Restore
2. Klik Create a restore point > Next
3. Taip tajuk restore point > Create


BACKUP DOCUMENTS/FOLDER

1. Klik Start > Programs > Accessories > System Tools > Backup
Jika tidak ada, install program NTBACKUP

http://www.winxptutor.com/ntbackup.msi

2. Pilih kaedah backup


3. Pilih Folder/Data untuk backup


4. Dan teruskan backup <--- tentukan lokasi untuk simpan fail backup

SENARIO 2


Selepas komputer dihidupkan, komputer 'hang' sebelum dapat masuk Desktop.
Indicator Bar sentiasa berpusing2.


=====================

PENYELESAIAN

Ada beberapa cara untuk mengatasi masalah ini;
1. Boot SafeMode
2. Restore Point
3. Restore/repair Sistem Windows

=====================

CARA SAFE MODE

1. Hidupkan komputer dan tekan kekunci F8
(tekan sebaik sahaja komputer buat proses POST)


2. Pilih Sistem Operasi

3. Login dengan akaun Administrator

PADA DESKTOP

1. Semak hardware conflict dan cuba disablekan.
2. Scan virus/spyware
3. Guna restore point yang terdahulu

=========================
Jika sekiranya Safe Mode gagal berfungsi, pilih Safe Mode with Command Prompt
(menu pilihan ke-3)

Pilih sistem operasi dan administrator.

Command Prompt


Masukkan arahan:
%systemroot%\system32\restore\rstrui.exe


Dan teruskan proses restore point.

SENARIO 3

Bila on komputer selepas check BIOS (proses POST) komputer cuba 'load' Windows
kemudian restart dengan sendiri. Tak sempat nak tekan kekunci F8 untuk masuk SafeMode.
=========================

PENYELESAIAN:

Ada kemungkinan masalah hardware.
> Tanggalkan RAM dan bersihkan kaki RAM dengan pemadam getah (eraser)
> Tanggalkan Kad Grafik dan bersihkan sambungannya.
> Pasang semula.
> Cuba On komputer.


Restore Windows XP

1. Pastikan komputer boleh boot dengan cdrom
Semak dalam BIOS supaya 1st boot device adalah cdrom

2. Boot komputer dengan cdrom pemasangan Windows XP SP2 yang original
Biasanya windows XP yang telah dipinda atau cd cetak rompat tiada pilihan untuk restore.
Page copy protected against web site content infringement by Copyscape
Sign up for PayPal and start accepting credit card payments instantly.